Have you ever wanted to start your own TV fansite, or your own blog on any subject whatsoever?
Since we started in 2004, Back to the Bay has grown to be one of the biggest TV fan sites around. Thousands of you visit the site every day to find out more about the show, spoil yourselves by discovering what’s happening in upcoming episodes, and to chat about the show with thousands of others on our forum.
The site has afforded many of us, and some of our forum members, the opportunity to meet stars of the show, interview countless actors and crew members, and work with other publications like TV Soap to help them prepare articles like their annual Hits and Misses article.
If you’ve got a TV show you love, or any other topic that you want to write about, then starting your own blog or fansite is a great way to write about something you love, and maybe even get opportunities within that world.
Why should I start a blog?
Many people start blogs simply because they want to write about something they love. It’s the reason we started BTTB back in 2004 – we just wanted to write about Home and Away and keep other fans up to date with everything happening on the show.
Others want to use it as a way to move away from the 9-5 lifestyle and do something more interesting. There are countless success stories of bloggers who’ve eventually given up their jobs and made blogging their full time career, and have made some pretty decent money out of it!
Others manage to get themselves freebies or invited to special events. Travel bloggers, for example, often get freebies to certain events or attractions in exchange for writing about them. Many lucky fashion bloggers will get sent a whole array of makeup, skin creams etc from brands wanting to get in front of their audience.
Whether you want to start a blog, fansite or website just to talk about your favourite subject, or whether you do want to make a bit of extra money on the side, it’s super simple to get stated.
Can I start a blog? I don’t have any technical skills
While the site is now a complex collection of various different types of content – character profiles, episode summaries, news articles, features and a busy forum – it started out much smaller. We’ve been around since 2004, when we mainly focussed on Home and Away news, and we’ve added more and more sections over the past 14 years.
However, while these days the site is pretty complex, starting your own TV blog or fansite is surpsingly simple! Even if you’ve never started a website before, you can get set up and ready to add content in under 20 minutes.
This guide will show you how, talking you through the whole process from start to finish.
So what do I need to do?
There are 4 basic steps:
- Get yourself a domain name and hosting
- Install WordPress
- Choose a theme/design and make the site come to life!
- Add content
1) Get yourself a domain name and hosting
First, you need to choose a domain name. This is the URL that you type in to get to the website. In our case our domain is backtothebay.net, but yours can be whatever you want, as long as it isn’t already taken.
This is often the hardest part – you want to choose something that you’re going to love for years. It’s never a good idea to change your site’s name or move it to a new domain once you’ve started adding content, so choose carefully! It took Jeremai and Chris (the original founders of the site – Chris still runs the place, and Jeremai still contributes to episode summaries and character profiles) weeks and weeks to come up with Back to the Bay as a name, and they brainstormed hundreds of choices.
Once you’ve got an idea, you can check whether the domain is available.
We recommend you register your domain and host your site with Bluehost – by doing both things in one place, it’ll make it easier going forward. The domain is the URL of the site, while the hosting is where your site and its files actually ‘live’, i.e. the server space.
To check whether your domain is available, and get started setting up your hosting, click here.
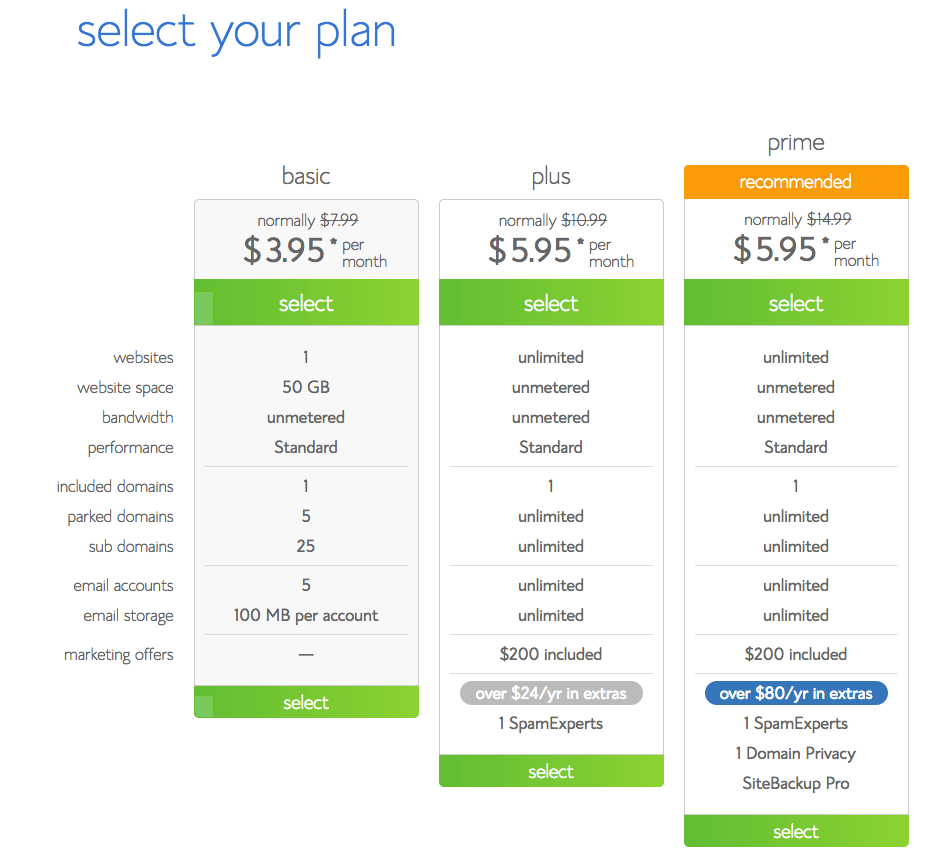
Once you click on the link, you’ll be asked to choose a plan. The ‘Starter’ plan will be absolutely fine for you to start with, and you can always upgrade if you need to once the site grows.
Don’t worry – there’s no need to pay anything just yet, not until you’ve found out if your domain name is actually available.
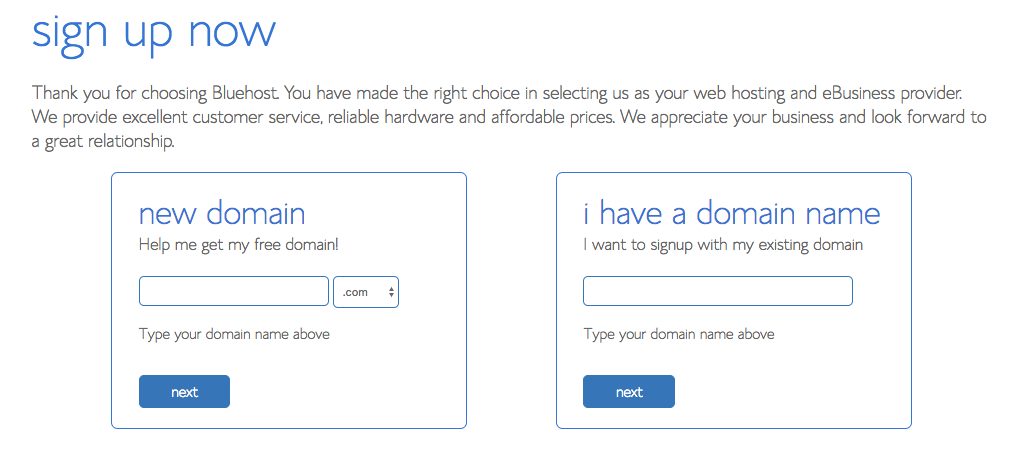
Once you’ve selected your plan, you’ll see the above screen. Type in your ideal domain name into the left hand ‘new domain’ box, select the domain extension (e.g. .com, .net, .org) that you want and click next.
If you tried to register backtothebay.com, it would tell you it was already taken, and show you a screen like the below:
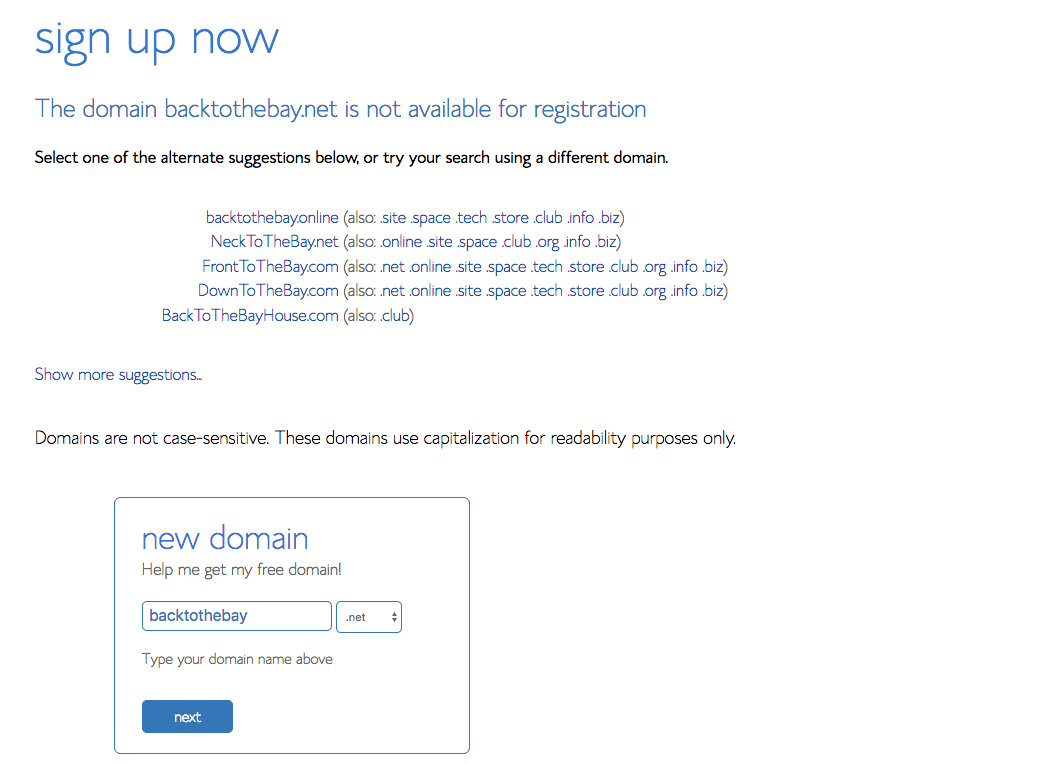
So, time to try again. However, if you manage to find out that’s available, you’ll see this screen:
Now we’re talking! From here you can confirm your plan details, by selecting whether you want to pay for 12 months, 24, 36 or 60 months. Note – although it gives the pricing as ‘Per month’, it will actually charge you a lump sum. The per month price is just the overall price divided by the number of months you’ve signed up for.
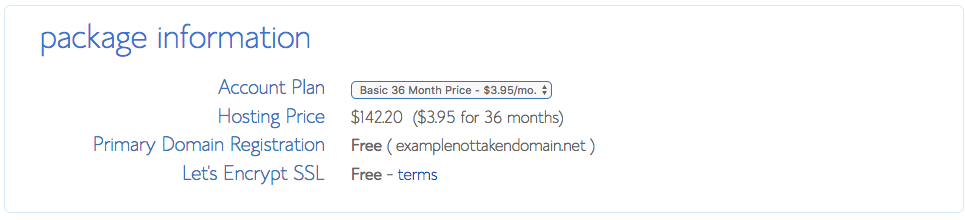
Although the longer-term plans technically cost less per month, you pay the amount up-front, so we’d recommend you choose the 12-month plan.
You never know whether you’ll want to move hosting after a year, or you may have found out that blogging isn’t for you – so we’d say go for 12 months for now, and you can always commit to a longer-term plan once the 12 months expire.
Bluehost automatically ticks a few of the ‘Package Extras’ box. Personally, we’d recommend you switch off Domain Privacy Protection.
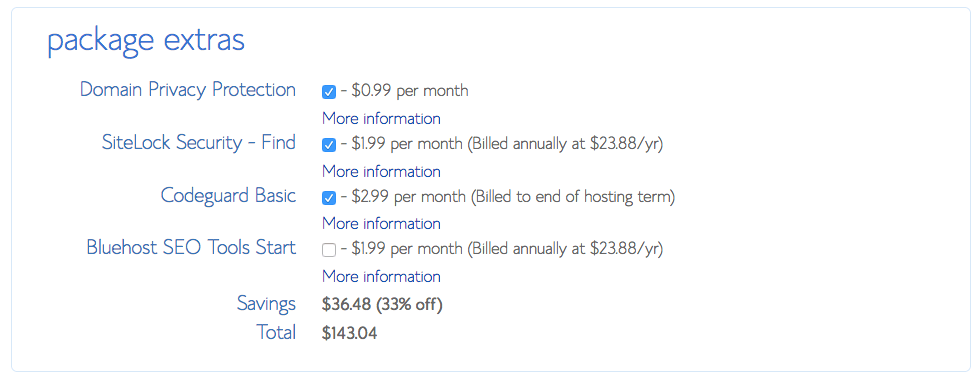
Domain Privacy Protection stops your personal details from appearing in the ‘WHOIS’, which is a public directory listing the owners of domain names. However, since the European regulation ‘GDPR’ came into place in May, the WHOIS directory has stopped listing people’s personal details, meaning the domain privacy protection is no longer needed.
SiteLock Security is probably worth it – it scans your site for malware and makes a few other vulnerability checks to ensure that you’re secure. While there are WordPress plugins that can do similar things, for $1.99 a month it’s probably a price worth paying.
CodeGuard Basic makes a daily backup of your website, so you can easily restore your site to an earlier version if you manage to screw something up!
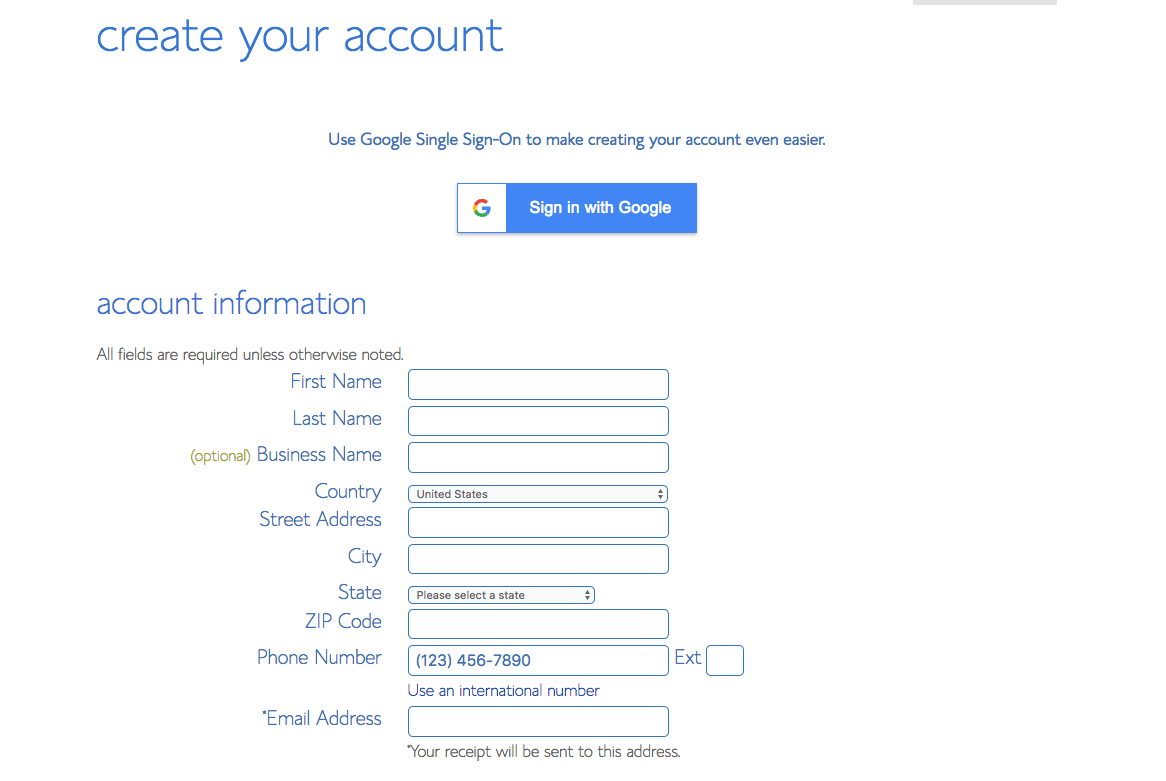
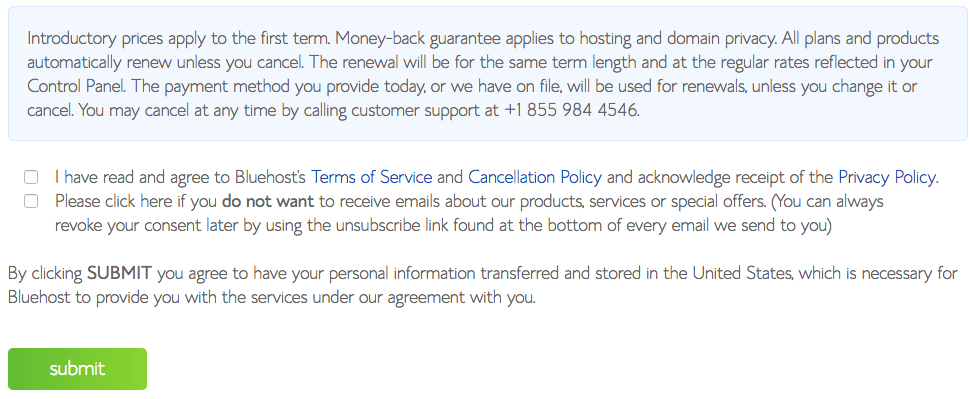
Once you’ve done this, you just need to enter your personal details and payment details. Then you just need to click the boxes at the bottom to show you agree to their terms.
Take note, if Bluehost has an offer on and you’re being charged the offer price, then the offer price only applies for your first term.
Once the 12 months (or however long you’ve chosen) ends, you’ll be paying the higher price – so make sure you can afford to pay this higher price, or be sure to cancel the hosting after the initial period and move elsewhere if necessary.
Set up WordPress
Yay, you’ve finished making your Bluehost account! Now it’s time to get your site working.
WordPress is the software that powers Back to the Bay, and is the most popular pieces of blogging software / website builders in the world. It’s free to add and use, and powers over 30% of the world’s websites.
To install WordPress, just log into Bluehost, then find the ‘Website Builders’ section. Click on the WordPress logo.
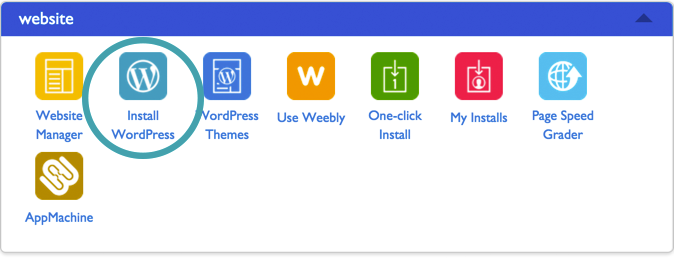
On the next page, you’ll see a big green ‘Install’ button. Click this, then on the next screen select your new domain, and click ‘Check Domain’.
Have a quick look over the Terms and Conditions, tick the ‘I have read the terms and conditions of the GPLv2’ box, and click ‘Install Now’.
After a few seconds, you’ll see a big message telling you that “Your install is complete!”. Awesome. Clik the ‘View Credentials’ button and write down the admin URL, username and password that it gives you. We recommend you change these to something a bit more memorable once you log in.
Type or copy your Admin URL into your web browser. It’ll end in /wp-admin/
You can now enter your username and password and log into the WordPress ‘back-end’. It’s from here that you can add posts, pages and any content you want.
You should also now be able to visit your website from the URL you chose!
So how do I make it look nice?
The default WordPress theme is okay, but it’s probably not how you want your site to look. This is where the fun starts, as this is where you can choose your website’s theme.
WordPress has hundreds of themes available. You can see them at http://wordpress.org/extend/themes/ or view them directly from within your new WordPress site.
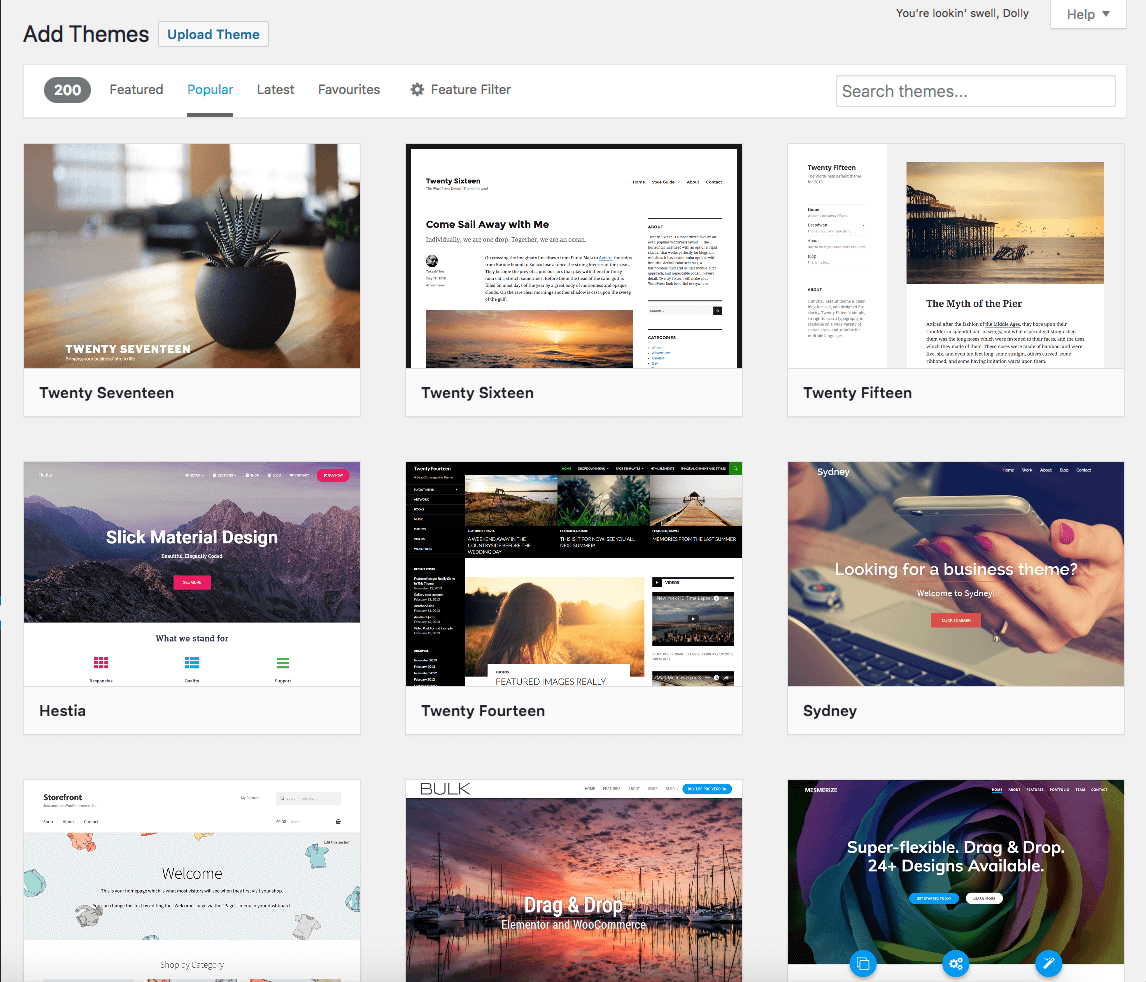
Just go to Appearences > Themes, then click the ’Add New’ button. You’ll see hundreds or thousands of themes, and installing one is as simple as hovering over the thumbnail, clicking ‘Install’, then clicking ‘Activate.
There are also thousands of paid themes, available from places like ThemeForest. Often these themes are nicer or with more features, but there are plenty of lovely free themes around!
When you download a theme from one of these sites, it’ll likely send you a Zip file (.zip) containing all of the theme files. There’s no need to open up this zip, just go to the Appearences > Themes page, back into ‘Add New’, but this time click the ‘Upload Theme’ button at the top.
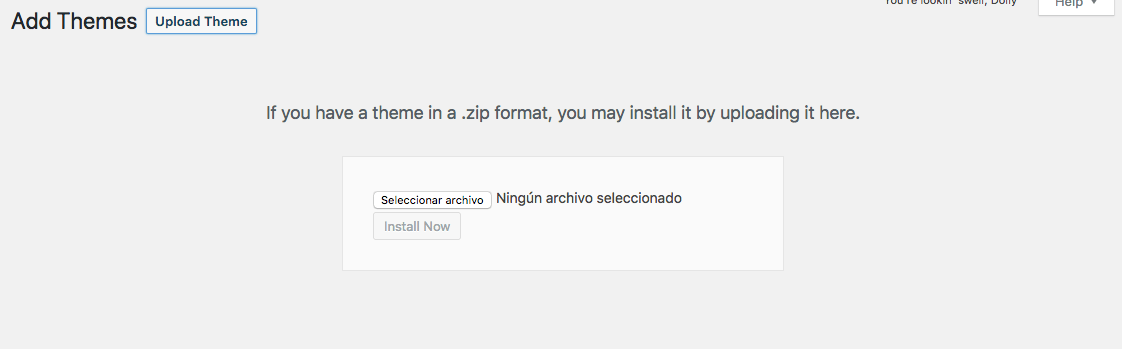
Now you can click ‘Select archive’ and choose your newly downloaded zip file. Once it’s installed, just hover over it and click the ‘Activate’ button.
And there you go! You’ve got your brand-new blog or fansite set up and ready to add content! To start adding blog articles or posts, go to the ‘Posts’ screen in the left-hand menu. To add static pages like About Us pages, go to the ‘Pages’ section in the left-hand menu.
Let us know how you get on, and best of luck with starting your brand-new fan site or blog! If you’ve not started, now’s the time – head to Bluehost and see if the future home of your new blog is available.